There were many posts on this subject, however none of them use the boilerplate already available and written by Optimizely. For example it is not needed to render ShellResources and more, render the ShellCoreLightTheme, handle the XSRF token or to register the web components manually. All those are already available when you use a shared view called
CommonLayout.cshtmlIn my previous post Useful Optimizely CMS Web Components I described how to use web components shipped in CMS12.
This time I will show you the whole thing, how to add a MenuProvider so that a new menu entry is displayed, how to add a new MVC view with a controller and how to reuse the boilerplate already provided by Optimizely CMS.
Let's continue with the example of a very simple NewsArticle generator. The UI is very basic, just a few inputs and a button.
Let's add a new menu provider so that Optimizely's navigation will render a new menu entry:
[MenuProvider]
public class NewGeneratorAdminMenuProvider : IMenuProvider
{
    public IEnumerable<MenuItem> GetMenuItems()
    {
        var urlMenuItem1 = new UrlMenuItem("Generate content", MenuPaths.Global + "/cms/admin/newsGenerator",
            "/NewsGeneratorPlugin/Index")
        {
            IsAvailable = context => true,
            SortIndex = 100,
        };

        return new List<MenuItem>(1)
        {
            urlMenuItem1
        };
    }
}
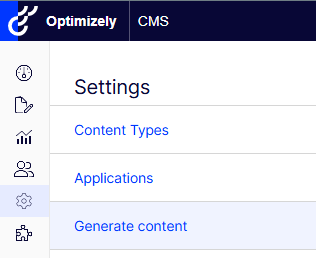
After that we would see a new menu entry:

Let's now add an empty view to
Views/NewsGeneratorPlugin@using EPiServer.Shell.Navigation @{ Layout = "/CmsUIViews/Views/Shared/CommonLayout.cshtml"; } @section header { <style> html, body { height: 100%; } </style> } @section mainContent { <div @Html.ApplyPlatformNavigation()> <div class="container"> <h1>My add-on</h1> </div> </div> }
As you can see we are reusing a shared view from Optimizely which will render html, head, body tags and also navigation. It will also render basic stylesheets and register web components described in my previous blog post.
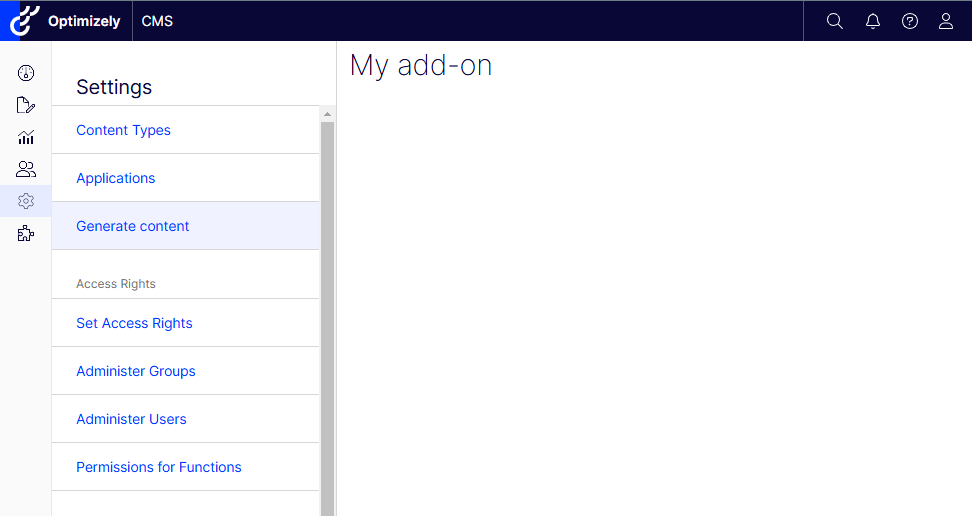
Now after rebuilding the site we should see:

As you can see we have to wrap the whole content into a div with:
<div @Html.ApplyPlatformNavigation()>
so that it's positioned correctly.
Now we can use the web components, please find the full source of the simple content generator:
@using EPiServer.Shell.Navigation

@{
    Layout = "/CmsUIViews/Views/Shared/CommonLayout.cshtml";
}

@section header {
    <style>
        html,
        body {
            height: 100%;
        }

        body {
            background-color: #fff;
        }

        .container {
            padding: 16px;
            border-top: 1px solid #D6D6D6;
            margin-left: 0;
            margin-right: 0;
            width: 600px !important;
        }

        .container h1 {
            margin-bottom: 32px;
        }

        .formField {
            display: flex;
            justify-content: space-between;
            margin-bottom: 20px;
        }

    </style>
}

@section mainContent
{
    <div @Html.ApplyPlatformNavigation()>
        <div class="container">
            <h1>Generate content</h1>
            <div>
                <div id="result"></div>
                <div class="formField">
                    <optimizely-typography type="caption" text="Root id"></optimizely-typography>
                    <optimizely-content-tree id="content-tree"></optimizely-content-tree>
                </div>
                <div class="formField">
                    <optimizely-typography type="caption" text="Count"></optimizely-typography>
                    <optimizely-input id="count-input" value="10"></optimizely-input>
                </div>
                <div class="formField">
                    <optimizely-typography type="caption" text="Truncate parent"></optimizely-typography>
                    <optimizely-checkbox id="truncate-checkbox"></optimizely-checkbox>
                </div>
                <div class="formField">
                    <optimizely-typography type="caption" text="Generate images"></optimizely-typography>
                    <optimizely-checkbox id="truncate-generate-images"></optimizely-checkbox>
                </div>
                <div class="formField">
                    <optimizely-typography type="caption" text="Also create notification"></optimizely-typography>
                    <optimizely-checkbox id="truncate-create-notification"></optimizely-checkbox>
                </div>
                <optimizely-button id="generate" buttonStyle="highlight" text="Generate"></optimizely-button>
            </div>
        </div>
    </div>
    <script type="text/javascript">
        const data = {
            count: 10
        };

        document.getElementById("content-tree").addEventListener("onNodeSelected", (event) => {
            data.root = event.detail.contentLink;
        });

        document.getElementById("count-input").addEventListener("onChange", (event) => {
            data.count = event.detail;
        });

        document.getElementById("truncate-checkbox").addEventListener("onChange", (event) => {
            data.truncateParent = event.detail;
        });

        document.getElementById("truncate-generate-images").addEventListener("onChange", (event) => {
            data.generateImages = event.detail;
        });

        document.getElementById("truncate-create-notification").addEventListener("onChange", (event) => {
            data.createNotification = event.detail;
        });

        document.getElementById("generate").addEventListener("onClick", () => {
            var result = document.getElementById("result");
            result.innerHTML = "Command in progress...";

            var formData = new FormData();
            Object.keys(data).forEach(key => {
                formData.append(key, data[key]);
            });

            var xhr = new XMLHttpRequest();
            xhr.onreadystatechange = function () {
                if (xhr.readyState === 4 && xhr.status === 200) {
                    result.innerHTML = xhr.responseText;
                }
            }
            xhr.open("post", "/NewsGeneratorPlugin/Generate");
            xhr.setRequestHeader("Accept", "application/json");
            xhr.send(formData);
        });
    </script>
}
It is very simple but is ideal for admin tools which do not have to look pretty but just decent or for some developer only tools like in our case a content generator which can be used during QA.
If you already have an add-on, don't want to switch to the CommonLayout.cshtml and just want to use the web components you will need to register them explicitly like this:
@Html.Raw(Html.RegisterOptimizelyWebComponents())
All the above information is accurate only if you place the code in the main webapp project. However, if you would like to have the addon in a separate module/assembly you will need a bit more boilerplate.
A full working sample can be found here: https://github.com/barteksekula/optimizely-admin-mode-addon-starter-kit
Feel free to fork, copy and adjust however you want!